|
BWF Widget ProTM Instructions
For Version 1.117 and later
click here for downloadable PDF version
Purpose:
This software was created in order to allow production and post-production sound professionals a means of examining audio Broadcast Wave Files and gathering pertinent meta-data contained in each file and organizing that into a data format that can be easily read and shared by means of standard database exchange files. BWF -Widget Pro also allows you to edit this gathered database or even edit the Metadata contained in the broadcast wave files.
Installation:
Extract the zipped file to a folder on your computer's hard drive and run the Setup.exe file. The program should install in your program files folder and be available as a shortcut under program files titled: BWF Widget Pro.
System Requirements:
Windows 9x, 2000 or XP.
Windows Media Player 9 or later.
Appropriate sound-card and sound output hardware for playback.
This software will not run natively on a MAC, but may have limited functionality on Windows running on Virtual-PC on a Macintosh. I haven't confirmed audio playback is supported on such a system.
Operation:
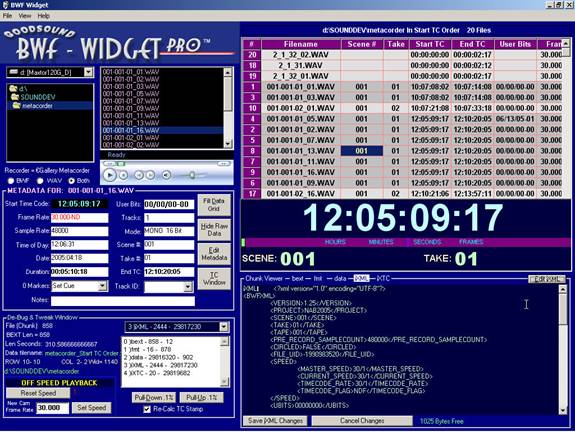
When you first launch BWF Widget you will be presented with a small window that shows some file-navigation list boxes and some fields where the resulting metadata is shown.
Find your Wave Files:
First select the drive from the drop down box that contains the broadcast wave files that you want to examine and catalogue. Then, using the folders window, double-click on the folder that contains the files of your project. You should see all BWF or WAV files in that folder listed in the file list box on the right. If you click on any file or use the arrow keys to navigate up and down the list you will be presented with the metadata for each file in the area below.
Gather the Metadata for all files in the Folder:
If you click on the "Fill Data Grid" button in the metadata display area the window will expand some and gather the metadata from every BWF or WAV file in the selected folder. If the selected folder contains Sub-folders a popup message box will ask if you want to include the files in the Sub-Folders. If you answer Yes, BWF-Widget Pro will gather metadata from every Broadcast wave file from every folder contained within the selected folder. Once filled, the data in the grid can be sorted by any of the listed meta-data elements. The default sort is by Time Code in Ascending order if a single folder is selected, or by Path (folder name) if you choose to add files from multiple sub-folders.
To re-sort the data in the grid on any other key just use the mouse to double-click on any header name at the top of the grid. The list will then be sorted in the order of that item. If you Double-Click on "Scene #" label at the top of the grid the files will all be sorted according to Scene number then Take number respectively. The grid coloring is designed to help you quickly determine where the sorted items change. In other words, if you sort by Scene #, the row colors will change every time the Scene # changes. Column widths are adjustable to allow for different width data. Just click and drag the dividers in the top label bar to adjust the column widths. You can maximize the window to fill the display in order to see more columns in the Data Grid without having to scroll horizontally. You can also move or re-arrange the positions of the columns themselves. Just Right-Click on a column head and drag it left or right and drop it in the new position. In the View/Options Menu you can choose what Fields are included when filling the Data Grid. Just un-check any Metadata field in the list box that you don't want to include in the grid. You must re-load the grid for your new choice to take effect.
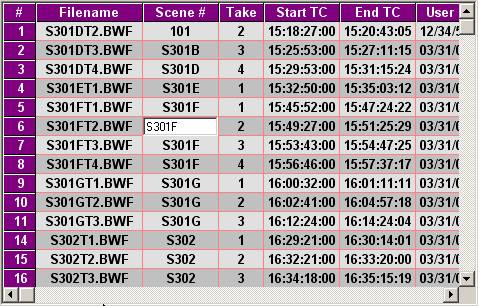
Edit Metadata in the Grid-- There are two places to edit the metadata. You can edit any field in the Data Grid. This will only change the text that is saved as a Data File when you save the Grid Data. The changes made in the Data Grid are not saved in the actual Metadata of the Sound File. Just select any field in the grid then press F3 to edit that field. Press "Enter" to save your changes to the grid or "Escape" to cancel the changes and return to the original data. This is useful for adding notes or marking preferred takes with an asterisk or other marker.
Edit Metadata in the Grid
EDITING METADATA IN THE GRID
Save Collected Meta-Data to a file:
If you click on the "File" Drop-down Menu bar, you can choose "Save Data File" from the menu or use the "Ctrl-S" keyboard shortcut, the program will immediately export the Data in the Data-Grid to a tab delimited text file and place it in the same directory as all the BWF files. If your files are residing on a Read only Media, like CD-Rom you will be presented with the "Save As " dialogue box when you click on the "Retry" button and allowed to choose another drive and folder for saving the file. The Filename automatically created by BWF-Widget reflects the name of the folder and sort order of the data saved in the text file. This file can be loaded into Excel or any Database program that supports "Tab Delimited Text files".
Save a selection from the Data Grid to a file:
You can use the mouse to select a subset of the entire data grid. Click and drag across the column heads to highlight a series of columns within the grid or Drag down the Row Headers to highlight a series of row entries within the grid. Then Right-Click on the selection and Choose "Save Selection" in the pop-up menu. You can also select a block of data within the grid by holding down the mouse button on the cell for the upper left corner of the block and dragging down to the lower right cell of the block you want to select. This subset, along with the column heads will be saved to a file with the prefix "SubSect" and the name of the folder and the type of sort. Or you can use "Save Selection As" to rename the file and place it wherever you like.
Copy a Selection from the Data Grid to the Clipboard:
A handy feature allows you to Select an area of data from the Data-Grid and Copy it to the Clipboard. You can select a block of data or the whole grid then Right-Click inside your selection and choose "Copy Selection to Clipboard". You can then go to any application that supports Paste (Like Word or Excel) and paste the data directly into a spreadsheet or a word processing document. The headings are automatically taken with the data so if you don't need them just delete that row of labels after you paste the data.
To quickly Select the whole Grid just Click on the # sign in the upper left hand corner of the Data Grid.
Printing a List of the collected data Grid:
If you have a printer attached to your computer you can choose "Print Data File" from the drop-down File Menu. If your data won't fit on the page width you can either change the printer settings to Landscape Mode to print horizontally or you can change the size of the printout font in the View/Options menu to allow more data to be displayed on a row. The width of each column in the printout is set automatically to accommodate the widest data item in the column. The options Menu (under View) also contains some checkboxes that control whether a separator line is used to separate rows that have changed in the printout. This line is inserted wherever the background color changes in the data grid. This is useful if the Grid is sorted by Scene # as a line is drawn at the end of each scene. This makes the printout much easier to locate and read specific items. You can also select a portion of the Data Grid for printing. Use the mouse to select a block of data in the grid then Right Click on the block and choose "Print Selection" from the pop-up menu.
Find Files:
From the "File" dropdown menu choose Find Files or press "Ctrl - F" hotkey to bring up the Metadata Based File Search window. This window allows you to type in a Time Code (formatted as HH:MM:SS:FF) or User bits or just Text contained in the metadata to assemble a list in the Data Grid of all files that contain the search criteria. If your files contain meaningful Track Names such as "TRK1=Tom's Lav" or TRK2=Boom. You can enter any text in the text search field and if that text exists in the metadata of the file that file will be added to the grid when you click the "Find Files" button.
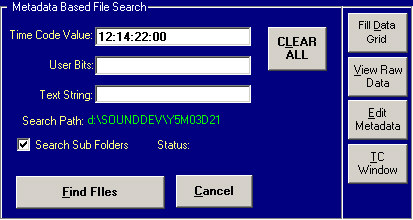
If the search Subfolders checkbox is checked, all folders contained at the current level of the current folder will be searched for the Text User Bits or Time code. You can enter a Scene number in the Text field to search for all files that contain that Scene number. If you search for a Time Code the program will return all files that contain that TC within the duration of that file.
Copy Files:
You can now use BWF-Widget Pro to copy selected files to new locations. Just use the mouse to select 1 or more rows in the Data Grid. Then Right Click on the Selection and choose "Copy Selected Files"
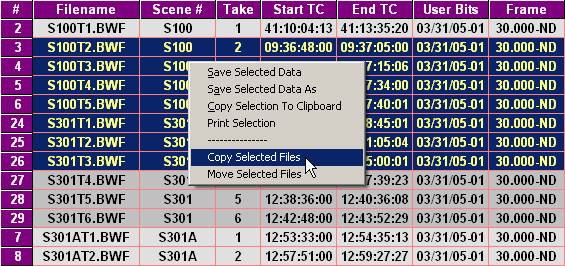
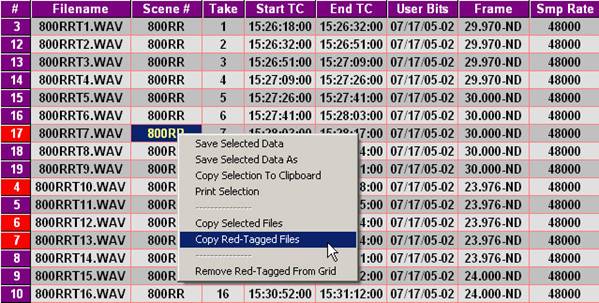
Besides using the mouse to select a range of files or clicking on the # sign in the upper left corner to select the whole grid, you can use the “Red-Tag” method to select any number of files anywhere in the data grid. Use the “T” key to toggle the Red Tag on and off for any selected file. The Number in the first column will change to Red to indicate it has been “Red-Tagged”. To Un-tag all files press the “U” key. All Red-Tagged files will be reset to Untagged. After you Red-tag any number of files you can then right click on the grid and choose “Copy Red-Tagged Files”
Red Tagged Files ready to copy
This will bring up the copy files Window with the files you selected in the pane on the right. Navigate to path where you want to copy the files in the file boxes on the left. Use the New folder button if you need to create a new folder in the current path. Then click the copy files button to start the copy process.
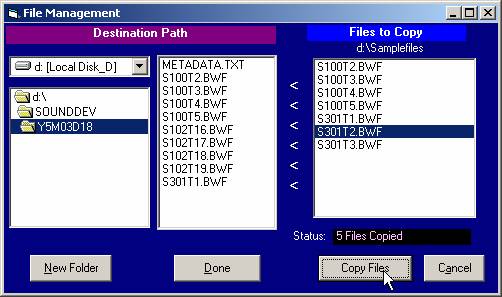 |
The status Line shows the progress of the operation. You can press the cancel button while the copy is in progress the program will complete the current file being copied and then abort. When Done click the "Done" Button to close the File Management Window.
You can also choose “Remove Red-Tagged files from Grid” to remove files from the grid before saving a data file or printing a log. To invert the selection of Red-Tagged files, click on the “#” sign in the upper left corner of the grid to select all the items in the grid. Then press “T” to toggle the selection. All Red-Tagged files will be revert to Untagged and all Untagged files will change to Red Tagged. Removing items from the Grid does not remove them from the disk, it only removes them from the current collection in the Grid.
File Playback:
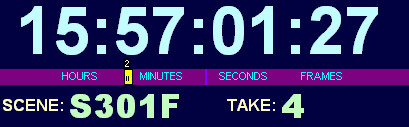
Currently BWF Widget allows you to play any file as long as your computer's audio hardware supports the bit-rate , word length and track count of the audio file. Most Stock Windows PC's currently only support up to 16 bit PCM sound files at up to 48048 Khz sample rate*. If your files are mono or 2 track16 bit 48k they should play by either double-clicking on the filename in the file list box or double-clicking on any Item in the Data Grid. Click on the TC Window to display the real-time TC display that shows you a large sizable floating Time code window that will track your file as you play it.
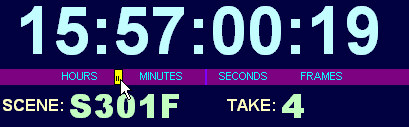
This window displays the Scene and take number for the playing file if that data is contained in the Meta-Data. The Tracker is the small vertical rectangle that tracks across the Time code display as the file plays. You can click and drag this tracker when paused (it turns yellow when paused and red when stopped) to move to any position within the current file. There are also Hot-Keys that control playback. Pressing "Enter" or "P" from the Data Grid or File List box will play the file at the current cursor position. Once playing the "Space Bar" allows you to Pause and Resume playing the current file. Pressing “Esc” key will stop playback and pressing "P" Key will re-start playback from the beginning. When paused, you can use the Left and Right Cursor Keys to move 1 frame Back or Forward. Hold down the Shift Key with the Cursor keys to move 1 Second at a time forward or backward. You can adjust the Left-Right balance of a 2 track playback by using the mouse to Right-Click in the Tracker Bar to set the balance from Left to Right Channel. The small purple line indicates the Balance Position in the tracker bar. If you find the Hot-Keys are not controlling the playback it is probably because you have clicked on some object that has stolen the focus. If you find this to be the case just Click on the BWF-Widget Logo in the upper left of the Window. This should restore the Playback to Hot-key control.
Cue Marks
Any cue marks set in the file when it was recorded will show up in the Metadata area in the Cues drop down box. Choose a cue from the dropdown to move to that location in the file.
Once you choose a cue mark you can instantly jump back to that cue by pressing the “C” key when the file is playing or paused. You can add new cue marks at any time by pressing the “M” key when the file is playing or paused. This will drop a new cue and set it as the current cue point that you will return to when you press “C”. A small number appears along the top of the center tracker bar in the TC window indicating which cue number is active and where you will return to when you press the “C” or Cue key.
 |
You can add as many cues to the file as you like. These are temporary unless you decide to save them to the file by pressing the “Save” Button next to the cues Drop-Down box. (See figure below) to move between cues you can either choose a new cue from the Drop Down Cues box or use the Keyboard shortcuts of “N” for Next cue , or “B” for Back one cue.
Those keys will move you through the cues that have been set in the file.
To adjust the position of a cue, first select the cue then position the tracker in the file to the position where you want the cue to start. (use the arrow keys to move 1 frame or Shift Arrow keys to move 1 second in each direction) When you have the new position selected press “Shift M” to move the currently selected Cue Mark to the current position in the file.
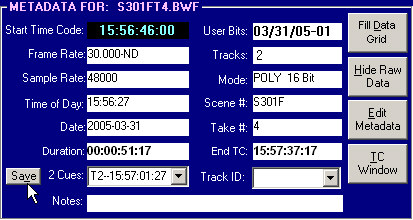 |
If you choose to Save cue points in the file press the “Save” Button that appears to the left of the Cues Drop Down box, a new Cue chunk will be added to the file or if one existed already, it will be updated with any new cues you added. This “Save” button will only appear if you have added cue Marks in the file. You will be asked if you want to save your new Cues whenever you try to move to another file and haven’t already saved any cues you may have created.
Advanced Playback features can be accessed from the Debug & Tweak Window. See that section for information about .1% Pull-Up and Pull Down or Off Speed Playback.
*Note: SoundBlaster Audigy2 soundboards and USB Audio devices support 24 bit and 96khz playback as well as multi-track (up to 8) tracks of sound playback. You must have sound hardware installed in your computer that can handle the bit-depth and sample rate of your files in order to playback BWF files with running Time code.
View Raw Data:
Clicking on the "View Raw Data" Button will display the "Chunk Viewer" text window at the bottom of the Data-Grid that displays the raw data in a textual format. A Wave file is made up of several chunks of data. This viewer allows you to view all the chunks contained in the selected file. You can view all the contents of the BEXT (Broadcast Wave Extension) Chunk or other data chunks of the currently selected file. This is useful for trouble-shooting Metadata layout and contents of any particular Broadcast Wave File. To view the contents of each chunk simply click on the small 3 or 4 character label at the top edge of the Chunk Viewer. The "data" chunk will only display the first 6000 bytes of the chunk since this chunk can be very long and viewing it in a Text window is of limited use. If your file contains iXML data you can view it and edit it in the Chunk Viewer. To close this windows just click on the button which now says "Hide Raw Data".
Edit actual Metadata in the BWF file
Bwf-Widget Pro allows you limited ability to edit and add tags to the metadata contained in the bext chunk of BWF files. Select the file you want to Edit in the File List Box and then click the Edit Metadata Button at the right of the Metadata view pane. This pops up a text editing box which allows you to edit the 256 byte user Metadata from the Bext Chunk.
In the lower right corner is a counter that shows you how much free space you have to work with in this chunk. As you add text or delete text this number changes to let you know if you are running out of room. The star-like symbols are fillers that indicate visually how much space you have remaining in the chunk. These should be kept at the end of the text, after any entries you may add. When you are done making changes or adding meta-tags click on the "Save Changes & Exit" button to update the BWF file with your changes. If you press "Cancel" no changes will be made to the file and the edit window will close. You are not allowed to change fields in the metadata like Recorder Name, Date, Time Created Sample Rate, number of channels, etc. or The Coding History data at the end of the Bext Chunk.. Changing that data is not allowed because they all are related to the actual structure of the audio data in the file and that structure cannot be changed by this program.
At the right side of the Edit Window is a scrolling list of common BWF Tags that can be inserted in the Metadata window by simply double-clicking on a tag. If the tag already exists in the window, the cursor will be placed at the right of the Tag (right after the Equal Sign) and you can then edit the existing data or add new tags (up to the limit of free bytes). If the new tag is not already in the metadata it will be added at the bottom of the list and the cursor is placed at the end ready for you to enter the user originated information.. End each line with a carriage return.
Editing iXML metadata in the file:
If your file contains iXML metadata you can use a process similar to the above BEXT editor to change and add to the iXML stack of information. Open the Chunk Viewer by pressing the "View Raw Data" button. If your selected file contains an iXML chunk you will see it indicated in the title bar of the Chunk Viewer. Click on "iXML" to display the current iXML data. At the right of the title bar of the Chunk Viewer is a button Labeled "Edit iXML" Click this button to put you in Edit mode.
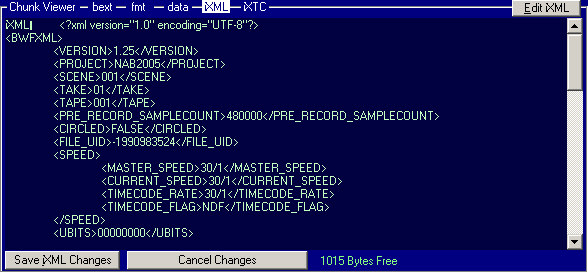
Then you can make any changes to the iXML data in the window. As in the BEXT editor you are shown a number at the bottom of the window that indicates how much free space is available for editing. Spaces at the end of the data are converted to Star characters while editing to indicate visually the number of characters available for adding text. If no "Stars" are visible at the bottom of the iXML chunk or if this "Free" number is 0 you can not add any iXML metadata. You can remove or change data as long as there is space available. For more information on the iXML format and allowed tag names and Syntax rules contact the manufacturer of the machine used to create the file.
View Options:
You can go to the View Menu and select "Options" to change settings for playback and Printing of files. You can also select new color schemes for the TC window and Grid. Use the mouse buttons to select a new foreground and background color for the sample text. Then double click on the labels below the sample text to apply those colors to the respective objects. The grid colors cycle through 1 to 4 in order so if you want only 2 colors (the default) then color Grid 1 and Grid 3 and Grid 2 and Grid 4 to be the same. Note: when you change the grid colors you must re-sort the grid to see the results. Click on the “Default Colors” button to reset all the items to their default colors.
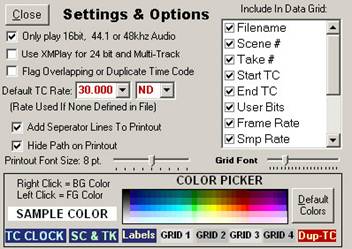
OPTIONS MENU
In the Options menu you can also control options like Printout Font size. Whether to add separator lines to the printout., Flag overlapping or duplicate Time Code. (when you sort by Time Code, files that overlap or contain the same time code will be highlighted in Red.) and the Default Time Code. Rate. This is the rate that will be used if the original TC Rate is not listed in the Metadata of the file. (appears as "xSPEED=030.000-ND").
DeBug & Tweak Window
From the View Menu click on "Debug & Tweak Window". (or Press the HotKey "Ctrl B") This window pops up underneath the TC default location. Drag the Time Code window out of the way to view the Debug & Tweak Window. This window contains tools for Advanced users and allows tweaking of a file's Sample Rate and Time Code Values as well as the ability to Playback a file at Off speeds for sync playback with film cameras for certain visual effects. (Common in Music Video Production)

WARNING: The tools in the Debug and Tweak Window make changes to the Format chunk and BWF chunk of the file. Since it is possible to permanently change your files to a point they may become un-playable, you should only use these functions on copies of files rather than the original file. Also these tools can only be used on files that are capable of being re-written (will not function on files residing on CD or DVD+-R disks)
The Pull Down .1% and Pull-Up .1%. These buttons offer an easy way to pull-up the sample rate and therefore the Speed of playback of a file by .1% Necessary for Files that will be matched to film played back in NTSC Telecine. If the Re-Calc TC Stamp is checked, the Time Code stamp at the head of the file is automatically counter-adjusted to compensate for the .1% change in the Sample Rate.. The Time code Number for the start of the file should not change when the Re-Calc Box is checked. If the Box is Un-Checked the timecode stamp in the file will be un-changed but because the sample rate changes, the resulting calculated Time Code will shift every time you change the sample rate. It can be shifted back by also editing the BWF Metadata xSPEED=xxx.xxx-ND Tag to reflect the .1% change.
For example if you want to Pull Up a file Recorded at 29.97 FPS to 30.000 FPS Timecode, Either leave the Speed set to 29.97 in the Metadata and Check the Re-Calc Box and click the Pull Up .1% Button. Or you could Un-Check the Re-Calc box, Click the Pull Up .1% button and then go Edit the Metadata to Reflect the .1% pull up in the TC Rate to "xSPEED=030.000-ND". If this sounds confusing it is because it IS CONFUSING. Time code in a BWF file is affected by the Sample Rate, Time Code Rate, and TC Stamp in the file header. Changing any one of these without compensating the others can result in the Time Code being shifted to an incorrect value.
If you are using BWF-Widget Pro for Playback of music for a Film, you can use the Pull-Up .1% button to adjust the playback track used on the set so that when the film is slowed down .1% in Telecine it will match back to the original 29.97 FPS TC on the music master. (leave the Re-Calc Box Checked)
A word of caution: Not all computers are created equal. Some Sound Chipsets are Locked at 44.1k and 48k and will not playback the 48048 hz or 44144hz file at it's pulled up speed. You can check your playback machine by recording a 10,000 Hz tone on a file and testing the playback with an accurate frequency counter hooked up to the output. You should see the frequency shift by .1% when you speed up or slow down the file by the same amount. If it doesn't change then your machine and /or its drivers don't support subtle changes in sample rate.
Off Speed Playback.
This small sub window in the Debug & Tweak window contains a tool to let you change the playback speed to match a camera that is not rolling at normal 24 or 30 fps sync speed. Many times for effect in Music Video production the DP may want to Over-crank or Under Crank the camera to achieve an unusual effect but want the singer to stay in sync with the track.. This utility should be used to change the speed of the playback the exact same ratio and will adjust the sample rate and Time Code Stamp as well as the TC display to compensate for the off-speed playback. The time code will count at the Faster or Slower Rate and maintain sync with the original track when the film is played back at normal sync speeds in Telecine.
For example: Record your tracks as BWF files at 29.97 or 23.976 FPS Time Code.
Then enter the New Camera Speed in the Text box and press the Set Speed button. If the Re-Calc TC box is checked the sample rate will change to reflect the change in camera speed equal to the ratio of the Telecine Speed (29.97 or 23.976) to the current Camera Frame Rate. This ratio appears in Red to the right of the Set Speed Button. The Sample Rate, Time Code Stamps and Playback ratio are written to the files Format and Bext Chunk. Then when the file is played on the set its speed and Timecode will be offset by the ratio so you can use the TC display in BWF-Widget as a TC slate to sync up the off-speed track. Remember to Reset the speed to normal before leaving the file or it will remain permanently off speed. You should NOT use this tool if the camera is rolling off speed and will be transferred in Telecine at the same Off Speed. In other words if the film is shot at 6 frames per second and will be played out in Telecine at 6 Frames per second you should not change the speed of the playback when shooting.
The other information in the Debug and Tweak Window shows things like byte offset and length of each chunk in the file, the rows and columns selected in the Data Grid, the duration of the file in seconds, the position of the cursor in the Chunk Viewer relative to the start of the file and the start of the chunk. It also shows the Filename for the saved Data Files and the Path to the current directory.
Exiting the program:
When you exit the program by either using "File - Exit" from the drop down menu. Or press the Ctrl-X hot-key, your current settings and the path to the current directory are saved so you can return to the same folder next time you start the program.
|